DIY Magic Milker
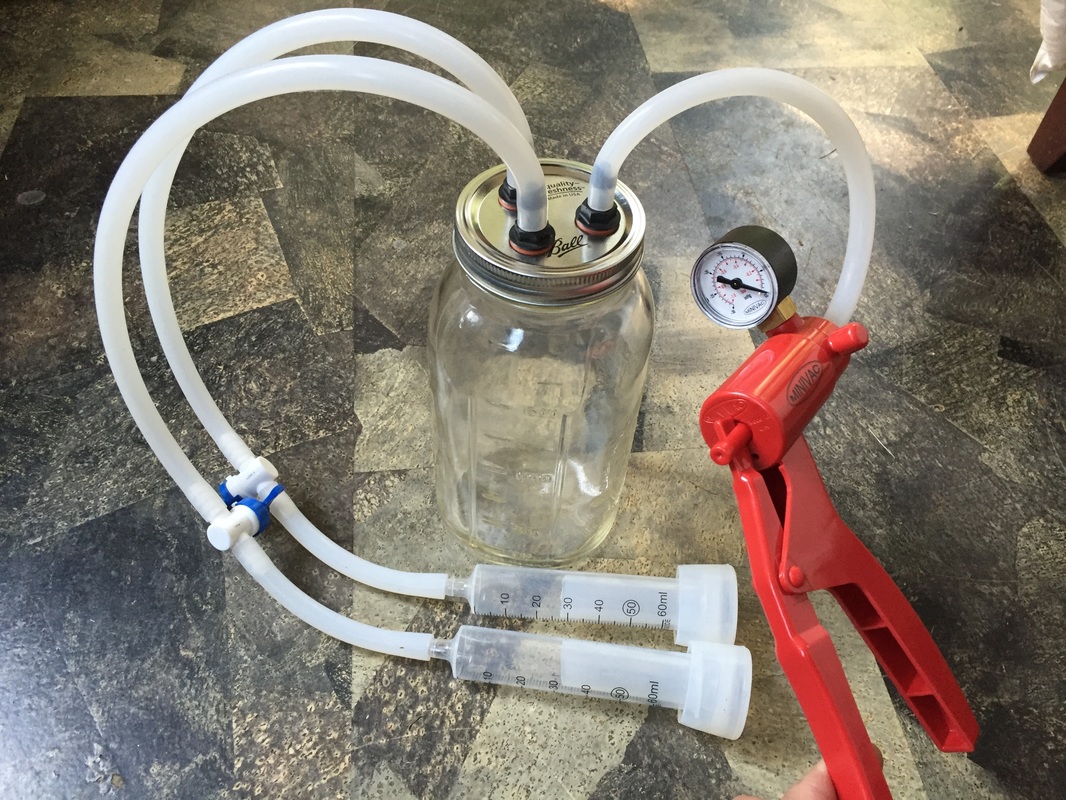
Nigerian Dwarfs and other mini goats and sheep can be a challenge to milk because of their small teats and sometimes very small orifices. My first doe was huge in milk giving triplets for her first freshening, but milking her was difficult. The udder was hard when full and the teats small and tiny streams came out. Even with practice, I realized it was going to be too frustrating and the doe's patience was wearing thin! With only a small herd it didn't make sense to buy a commercial milking system. What to do but try a jar milker? My first jar milker was a Henry Milker and I thought it was great! But sometimes (many times) I would pump it up and the air would escape due to the design of the lids on the jars which use a gasket to seal. The gasket never sat right in there and took more than a few tries to get a tight seal. That was when I decided to try to make something else that would work as well without the frustration of trying to make it seal. I loved the Henry Milker pump (made by MiniVac) but the jar sealing system just didn't work for me. So I worked on finding another way to attach the lines to the jars. Having mastered that with the fittings I still use, I also realized that ONE jar instead of two was a better way to go. Less parts means less money spent and it works just as well... no BETTER because it takes less effort to pump up to the right pressure to pump the milk from the teats. The other thing I didn't like was the syringes seemed like they would be uncomfortable and potentially damaging to my doe's teats. Why not use a silicone liner to soften it, and make it more comfortable? I ordered silicone liners used by commercial milkers and was surprised to find they fit right into the syringes! Voila! So, the Magic Milker was born. I decided to SHARE my design to the public so others can enjoy having an affordable milker that really works and is comfortable for the goats as well as the user!
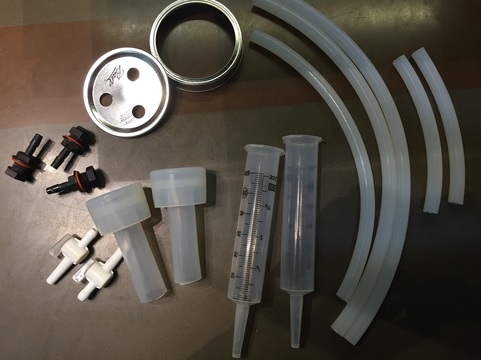
Here is a list of parts you'll need to make your milker and where to buy them:
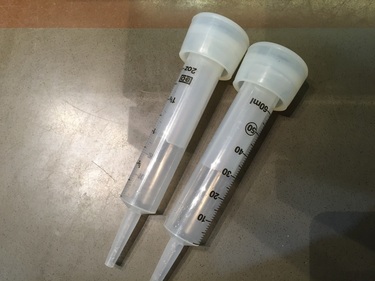
(2) 60ml syringes with catheter tips (these are sold everywhere including at Tractor Supply Company)
(2) silicone short goat milk liners. Link here: https://smile.amazon.com/Silicone-Goat-Liner-Small-Goats/dp/B06X6N27H5/ref=sr_1_2?keywords=silicone+goat+milk+liners&qid=1554308682&s=gateway&sr=8-2
5' of silicone tubing 1/4" ID x 1/2" OD. Link here: https://smile.amazon.com/Silicone-Tubing-ID-OD-Wall/dp/B079WW5JPN/ref=sr_1_3?crid=3JBL4ITBE7ENY&keywords=silicone+tubing+1%2F4+id&qid=1554308531&s=gateway&sprefix=silicone+tubing+%2Caps%2C145&sr=8-3
(3) Thru-panel adapters for fittings on lid. Link here: https://www.kempcospec.com/product-p/kitp4-4-4bn.htm
(2) 1/4" inline ball valves with barbed ends Link here: http://goo.gl/khgllK
1/2 gallon or quart wide mouth jar
Canning lids and bands
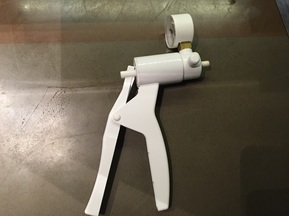
PUMP: MiniVac is the best I've found. Sold by Henry Milker (best price) or Amazon. It is manufactured in the UK which is why it is expensive. However it is the nicest quality and easiest to use I have found. Link here: http://goo.gl/PGOPzk
(Note: watch my video comparing different hand pumps)
Link to video: https://www.youtube.com/watch?v=a9IhflclW8Y
(2) 60ml syringes with catheter tips (these are sold everywhere including at Tractor Supply Company)
(2) silicone short goat milk liners. Link here: https://smile.amazon.com/Silicone-Goat-Liner-Small-Goats/dp/B06X6N27H5/ref=sr_1_2?keywords=silicone+goat+milk+liners&qid=1554308682&s=gateway&sr=8-2
5' of silicone tubing 1/4" ID x 1/2" OD. Link here: https://smile.amazon.com/Silicone-Tubing-ID-OD-Wall/dp/B079WW5JPN/ref=sr_1_3?crid=3JBL4ITBE7ENY&keywords=silicone+tubing+1%2F4+id&qid=1554308531&s=gateway&sprefix=silicone+tubing+%2Caps%2C145&sr=8-3
(3) Thru-panel adapters for fittings on lid. Link here: https://www.kempcospec.com/product-p/kitp4-4-4bn.htm
(2) 1/4" inline ball valves with barbed ends Link here: http://goo.gl/khgllK
1/2 gallon or quart wide mouth jar
Canning lids and bands
PUMP: MiniVac is the best I've found. Sold by Henry Milker (best price) or Amazon. It is manufactured in the UK which is why it is expensive. However it is the nicest quality and easiest to use I have found. Link here: http://goo.gl/PGOPzk
(Note: watch my video comparing different hand pumps)
Link to video: https://www.youtube.com/watch?v=a9IhflclW8Y
INSTRUCTIONS:
You will need to drill 3 holes in the top of the canning lid. I use a step-drill bit for this but you can use any kind of bit if you put the lid on top of a scrap piece of 2x4 or something. Make sure there are NO burrs as they will break the seal causing air leaks.
You will need to drill 3 holes in the top of the canning lid. I use a step-drill bit for this but you can use any kind of bit if you put the lid on top of a scrap piece of 2x4 or something. Make sure there are NO burrs as they will break the seal causing air leaks.
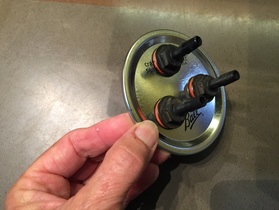
Attach your 3 through-panel adapters into the lid putting the red gasket on the top of the lid. Screw them down tight using a wrench or pliers but not tight enough to break them! If you find your milker is leaking air when you pump it up, it is most likely either the lid is not screwed down tight enough OR these valves are not screwed down tight enough!
Tubing needs to be cut to (2) 2' sections (these are for the teat cups) Reserve the 1' left for the pump line. Then cut the 2' sections again into 2 pieces: (1) 6" piece and (1) 18". The ball valves go in between the 2 pieces. The valves will be placed at the close end to the teat cups so they are easy to reach when you put them on the doe. The nice long lines make it easier to reach teats under your doe.
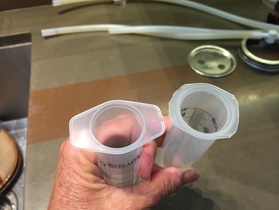
Take the syringes apart and use just the casing and insert the catheter end into the tubing at the end close to the valves. The other end of the tubing goes on the lid. The silicone liners fit down into the syringes. If your silicone liners are too long you can just cut them off. (I have found that some fit and some don't). Also some of the syringes need to be trimmed at the top to fit the liner on, but be sure to leave some of the edge on so the liner fits tight. (see pic).
Take the syringes apart and use just the casing and insert the catheter end into the tubing at the end close to the valves. The other end of the tubing goes on the lid. The silicone liners fit down into the syringes. If your silicone liners are too long you can just cut them off. (I have found that some fit and some don't). Also some of the syringes need to be trimmed at the top to fit the liner on, but be sure to leave some of the edge on so the liner fits tight. (see pic).
Attach the last line of tubing to the 3rd hole in the lid. Now attach your pump to this line. Your Magic Milker is ready to be screwed onto a wide mouth canning jar (quart or 1/2 gallon). Be sure to test your Magic Milker in the kitchen before you go down to milk. Turn the valves on the lines to the closed position (perpendicular to the line). Then pump up your pump to about 10 psi. This is where you will want to hold the pressure when you're milking. More pressure than this can damage your doe's teats. Check to see if the pressure is holding steady. If not, there is a air leak somewhere, probably in the lid which may not be screwed down tight, OR your thru-panel adaptors are not tight enough. Tighten everything up and try again. When your pump holds pressure at 10psi you are good to go!
I have uploaded a video showing how the milker works in action:
https://www.youtube.com/watch?v=eCe1pYzBrT0gl/X65GbM
HAPPY MILKING!!
I have uploaded a video showing how the milker works in action:
https://www.youtube.com/watch?v=eCe1pYzBrT0gl/X65GbM
HAPPY MILKING!!